Creating a Custom Context Menu in React with react-contexify
Creating a custom context menu in React can significantly enhance the user experience by providing quick access to relevant actions. With the help of the react-contexify library, you can easily implement a sleek and functional context menu tailored to your application's needs. In this guide, we'll walk you through the steps to create a custom context menu in React, ensuring your users have a seamless and intuitive interaction with your app. Let's dive in and unlock the potential of context menus in your React projects!
I have bootstrapped a new React TypeScript project for this walkthrough.
Adding react-contexify as a Dependency
npm install --save react-contexify
Add the default css in the main.jsx
import 'react-contexify/ReactContexify.css';
Add basic styles in the index.css
body {
  margin: 0;
  padding: 0;
}
Business Logic
I am creating a div that spans the full height and width of the screen.
export default function App() {
  return (
    <div
      style={{
        height: "100vh",
        width: "100vw",
      }}
    />
  );
}
Next, I will add the context menu to this div. This means that whenever a right-click event is triggered, a custom menu will appear.
Start of by adding a /src/components/ContextMenu.tsx
import { Menu } from "react-contexify";

export default function ContextMenu() {
  return <Menu></Menu>;
}
We can incorporate multiple <Items /> into the Menu component.
<Menu>
    <Item>Item1</Item>
    <Item>Item2</Item>
</Menu>
However, merely adding an item will not be sufficient. Each item should perform a specific action when clicked. We could do that:
<Item
  onClick={() => {
    alert("Hello");
  }}
>
  Hello
</Item>
Additionally, to separate two sections, we can add a <Separator />.
<Menu>
  <Item
    onClick={() => {
      console.log("Hello");
    }}
  >
    Hello
  </Item>
  <Separator />
  <Item>World</Item>
</Menu>
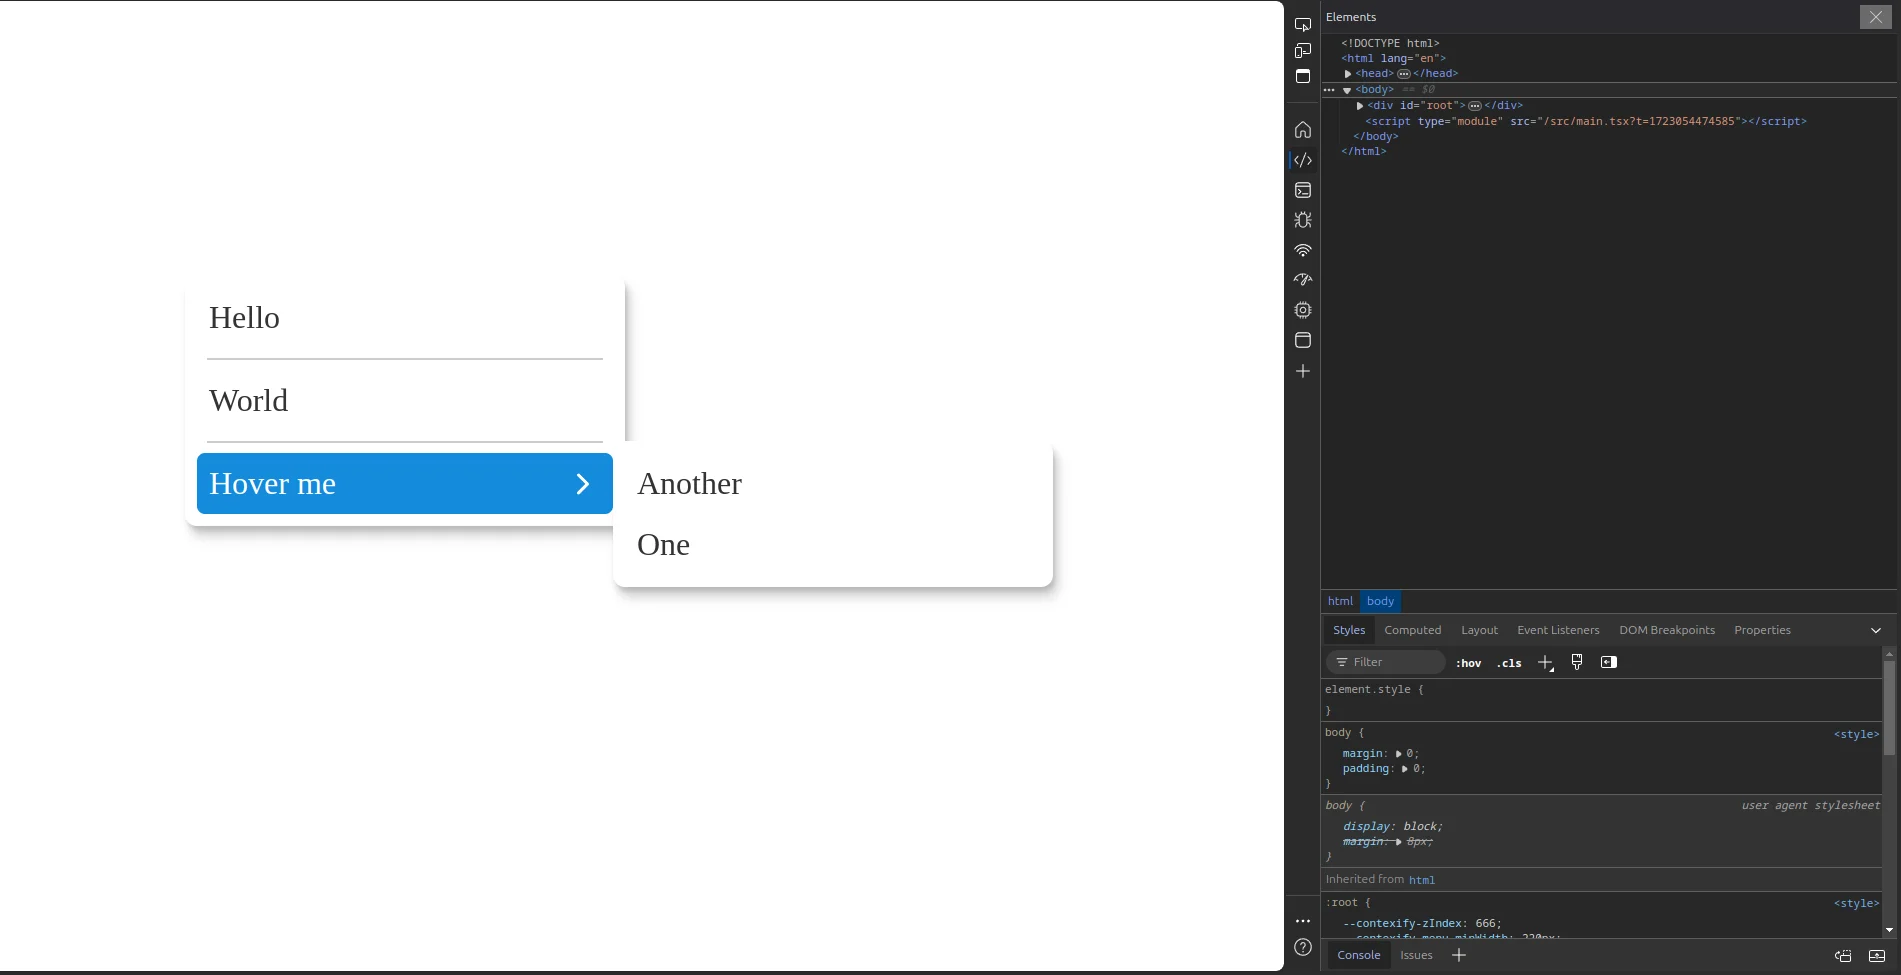
Additionally, we can incorporate submenus.
<Menu>
  //above code
  <Separator />
  <Submenu label={<>Hover me</>}>
    <Item onClick={() => {}}>Another</Item>
    <Item onClick={() => {}}>One</Item>
  </Submenu>
</Menu>
Now that we have created our Menu, you can experiment with it and add as many Items as necessary. Let's integrate it and observe it in action.
Additionally, you may notice this error
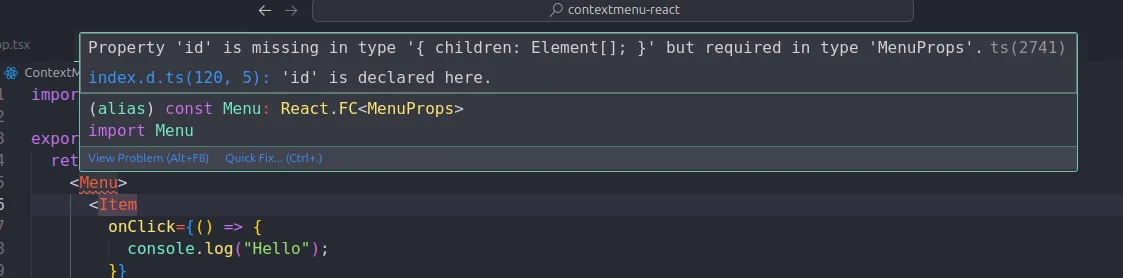
Let's fix both! Add an ID to the <ContextMenu/>
<Menu id="context-menu">
Add the ContextMenu in the App Component
import { Fragment } from "react";
import ContextMenu from "./ContextMenu";

<Fragment>
  <div
    style={{
      height: "100vh",
      width: "100vw",
    }}
  />
  <ContextMenu />
</Fragment>
Final Integrations
Now, to enable the menu to trigger on a right-click event
import { useContextMenu } from "react-contexify";

const { show } = useContextMenu({ id: "context-menu" });
Note: The ID mentioned here and the one in the <ContextMenu /> should be the same.
Now the last step add the onContextMenu event in the <div/>
<div
  style={{
    height: "100vh",
    width: "100vw",
  }}
  onContextMenu={(e) => {
    show({
      event: e,
    });
  }}
/>
Voilà! You can now see the menu in action.
Final Code:
// App.tsx
import { Fragment } from "react";
import "./index.css";
import ContextMenu from "./ContextMenu";
import { useContextMenu } from "react-contexify";

export default function App() {
  const { show } = useContextMenu({ id: "context-menu" });
  return (
    <Fragment>
      <div
        style={{
          height: "100vh",
          width: "100vw",
        }}
        onContextMenu={(e) => {
          show({
            event: e,
          });
        }}
      />
      <ContextMenu />
    </Fragment>
  );
}
// ContextMenu.tsx
import { Item, Menu, Separator, Submenu } from "react-contexify";

export default function ContextMenu() {
  return (
    <Menu id="context-menu">
      <Item
        onClick={() => {
          console.log("Hello");
        }}
      >
        Hello
      </Item>
      <Separator />
      <Item>World</Item>
      <Separator />
      <Submenu label={<>Hover me</>}>
        <Item onClick={() => {}}>Another</Item>
        <Item onClick={() => {}}>One</Item>
      </Submenu>
    </Menu>
  );
}
In conclusion, creating a custom context menu in React using the react-contexify library can greatly enhance the user experience by providing quick and easy access to relevant actions. By following the steps outlined in this guide, you can implement a sleek and functional context menu tailored to your application's needs. Experiment with different items and configurations to best suit your users' needs. Happy coding!